I’m moving, virtually

There has been some updates on my personal life. I’ve moved back to S.Korea from Germany last year, got employed by one of the biggest global company based here as a consultant.

So why am I saying ‘I’m moving’? Well, it’s not about myself, but about this blog. I’ve posted some of my works here for past 7 years and a lot of people came to visit. When I realized that I could monetize this blog, there was some limitation in wordpress.com which I didn’t aware of before.

So I decided to move to blogger(https://hojoongchung.blogspot.com). The new blog will be focusing on not only sharing my personal works but also updating the recent news related to AEC/BIM/Construction Technologies. Hope everything goes fine. See you all there 🙂

Efficient way of collecting sum of missing values per row in Pandas

While doing project assigned from the Udacity Nanodegree program I’m currently attending, I had to collect the number of null values in each row and display it in the histogram. However, the Pandas dataset contained 891221 rows, which I had to wait quite a long time to iterate through the rows using the following code:

df.apply(lambda row: sum_of_nulls_in_row(row), axis=1)

Although it was suggested in this post that using apply() is much faster than using iterrow(), it was still too slow to finish the project efficiently. After several search, I found this discussion. In Icyblade‘s answer, he mentioned this:

When using pandas, try to avoid performing operations in a loop, including applymapapplymapetc. That’s slow!

Icyblade’s suggestion was to use following code:


df.isnull().sum(axis=1)

I’ve applied it into my code, and Boom! It worked like a charm. Long waiting was eliminated and the result was there in a blink. A good lesson learned.

Project Owl: Video is up!

I have spent some time recently to revisit my old works and made a video out of it for the documentation.

This video shows how the Grasshopper component I developed in 2015 called Project Owl works. It generates 3D point cloud in Rhinoceros using Microsoft Kinect V2. The purpose of this development was to create a minimalistic component that only creates point cloud, and no more than that. Hope you have fun watching the video.

JavaScript Constructor Function

Although I’ve been using JavaScript at work to create some prototype applications, I haven’t noticed or used a feature called ‘Function Constructor’. While watching this Udacity course during my weekend, the instructor introduced what it is and I felt that I should record it here for the future use.

Function() constructor is explained as below according to this webpage:

The Function constructor creates a new Function object. Calling the constructor directly can create functions dynamically, but suffers from security and performance issues similar to eval.

So it creates the Function object, just like what classes do in general OOP languages. In JavaScript, the constructors like Function(), Object(), and Array() are not recommended to use because it has no benefits against the object literals like function(), object() and array() in terms of performance. The object defined by constructor gets parsed when it is called, while the object defined with the later one gets parsed with the rest of the code (ref). So what benefit does this constructor have for us? Well, it can create functions during the runtime! What does it mean? Let’s check it out through an example.

A function is normally defined like below without using the constructor in JavaScript:

var exampleFunction = function(a, b){
    return a + b;
}

And above function can be written as below using the constructor:

var exampleFunction = Function('a', 'b', 'return a + b');

The last argument inside the bracket of Function() is the actual function body, and the arguments before that are parameters for the body. This feature can be used as below:

var exampleFunction = function(a){
    return new Function('b', "return '" + a + "'+ b;");
}
console.log(exampleFunction(10)(20));

If you run this code with Node.js, the result is 30. Pretty cool, isn’t it?

So what is the actual benefit of creating a function during the runtime? As this StackOverflow question states, this technique seems to be quite useful if you want to embed certain behaviors of an object in a static data format like JSON and use the behavior later after you call the data.


Udacity Data Wrangling Project Done!

I am currently enrolled in the Udacity Data Analyst Nanodegree program. Yesterday, I’ve successfully submitted and passed the review of my third project, Data Wrangling. This project was about download some dataset from the web via HTTP, audit it if they have irrelevant values, clean it using the Python script, import it to the database (I chose MongoDB), and get some insights using the database query. So in summary, I’ve learned:

  • Data wrangling technique
  • Data auditing process using Python
  • MongoDB

Although I already knew how to work with Python and MongoDB pretty well, it was good to learn the overall process how to deal with data from the Web. Have a look on my exercise if you are interested in – you can find the report and the source codes here! I will keep posting my progress about Udacity Data Analyst Nanodegree program in this blog.

Vocabulary Memorizing Helper App: VocaLerne

Early this year, I started learning German after work. As many people have said German is really hard to learn, one of the hard parts for me was memorizing all the new words they teach me on each class. To practice web development as well as to practice using Google Firebase, I made this web app called ‘VocaLerne’ (Voca + Lerne).

It is very simple app: you login to the app using Google ID and insert words and its meanings, and be able to call the saved words by clicking ‘load’ button. The app calls the word randomly from the Firebase.

Screen Shot 2017-10-05 at 7.46.39 PM.png
App showing one German word and some buttons, and total word status. By tapping the word, users can see the meaning of the word they inserted in.


Now the source code of this application is on Github (https://github.com/hodgoong/vocalerne). Most of the operations including random word selection are done on the front-end side, and it makes the application slow when the internet speed isn’t so fast enough. My plan is to version this up by using my own back-end system with MEAN stack next year. The running example can be found from here. User can use it on any browser including mobile devices.

Pandas – Lambda function

After finishing the first assignment of Udacity Data Analyst Nanodegree, I decided to summarize and record most commonly used Pandas commands here. The first topic I would like to post is the lambda function.

Lambda function in Pandas can be used via apply() command something like below:

df = pd.DataFrame({'A':[1,2],'B':[3,4]})
df.apply(lambda x : x + 1)

Above code adds 1 to all the data resides in the DataFrame named ‘df’. The result looks like below:

__| A B
0 | 2 4
1 | 3 5

Lambda function can be applied to a single column using below code:

df['A'].apply(lambda x : x + 1)

But the result only shows the index and values without the column name like below:

0 | 2
1 | 3

To include the column name, following code can be used:

df.apply({'A': lambda x : x + 1})

And the result will look like this:

__| A
0 | 2
1 | 3

This lambda function can be used in the combination with groupby() function as well.

df = pd.DataFrame({'Year':[2016,2016,2017,2017],'Student':['Paul','Jack', 'Paul', 'Jack'], 'Score':[90,80,100,70]})
df.groupby('Student').apply(lambda x : x[x.Score == x.Score.max()])

Above code applies the lambda function after the data is grouped by ‘Student’ column values, in this case it aggregates the data based on ‘Paul’ and ‘Jack’. Lambda function collects only the row that are matching with the maximum value in that group. The result looks like below:

__________| Score Student Year
Student
Jack    1 | 80    Jack    2016
Paul    2 | 100   Paul    2017

Also, the same can be achieved by using agg() function after the groupby():

df.groupby('Student').agg({lambda x : x.max()})

This code provides much cleaner result than the previous code:

          | Score   Year
__________|(lambda) (lambda)
Student
Jack      | 80      2016
Paul      | 100     2017

Applying open source license on my Github repository

After I’ve uploaded my Project Owl code on Github, I felt something was missing but couldn’t figure out what it is. After a few hours later I found out that I forgot to mention which license this source code is under. Since it was my first time sharing my code to the public, I thought it would be good to research on what kind of license there is and what I should use.

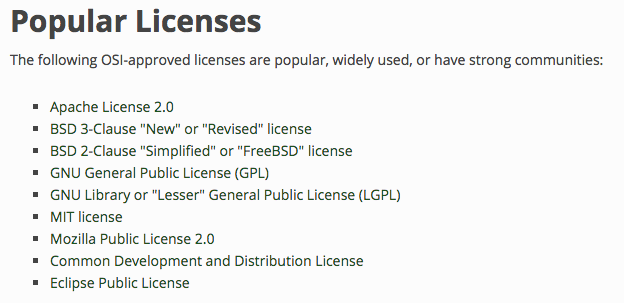
Google suggested me a website called Open Source Initiative on top when I searched ‘open source license’ for the search keyword. This organization claimed that they are the one where reviews the open source licenses. After some more search, it turned out that OSI isn’t the only organization that approves the open source licenses. Anyway, from this website, I found following list of licenses that were to be claimed ‘popular’:

Screen Shot 2017-08-28 at 7.14.12 PM
Screenshot from OSI website (https://opensource.org/licenses)

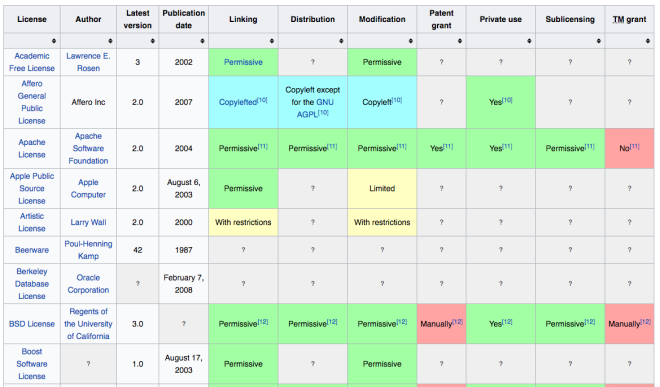
Although this site was useful in terms of understanding what is out there, I didn’t want to read through each license in too detail. So I searched again and found very nice summarized license comparison table from Wikipedia.

Screen Shot 2017-08-28 at 7.19.38 PM.png
Screenshot from Wikipedia (https://en.wikipedia.org/wiki/Comparison_of_free_and_open-source_software_licenses)

Also, choosealicense.com was very helpful in terms of showing bullet points of what is permitted with this license, what are the conditions, and what are the limitations.

Screen Shot 2017-08-28 at 8.02.49 PM.png
Screenshot from choosealicense.com (https://choosealicense.com/licenses/)

With the search keyword ‘how to apply MIT license to the code’, I also found a very useful post from StackExchange. The answerer was encouraging to use Github’s Contributor license agreement.

While I wanted to give as much freedom as possible to the people who try to use my code, the license needed to include freedom of modification, distribution, and even freedom for the commercial use. With this criteria, I also didn’t want to get into any kind of legal troubles with the code I uploaded. However, I honestly couldn’t understand the terms and conditions of the license 100%. So from above criteria, I chose the Unilicense since it has no conditions when it’s providing a full permission. Although it has a limitation on a legal issue, I thought it’s almost impossible to find an open source license that can protect me from lawsuits. So I decided to use Unilicense and went to my Github repo to add the license.

After clicking the ‘new file’ in the Github repo and typing in ‘LICENSE’ for the file name, a small button appeared on the right side to the file name input box with a text ‘choose a license template’. Voila! When I clicked that button, it showed list full of possible license templates I can use. I felt the time I’ve spent to find out how to put the license in the Github useless.

Screen Shot 2017-08-28 at 8.13.03 PM.png
After putting a file name ‘LICENSE’, a button showed up to the right.
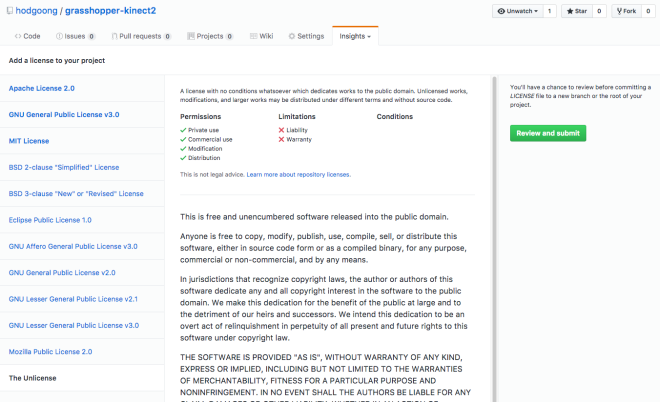
Screen Shot 2017-08-28 at 8.17.06 PM.png
When I clicked the button, list of licenses I can use showed up.

Without hesitation, I chose ‘The Unilicense’. I could easily imagine people in Github use Apache License 2.0, GNU v3.0, and MIT License the most because it was in bold characters. By clicking the green button on the right with ‘Review and submit’, the license paragraphs were automatically copied into the LICENSE file I made.

Screen Shot 2017-08-28 at 8.21.28 PM
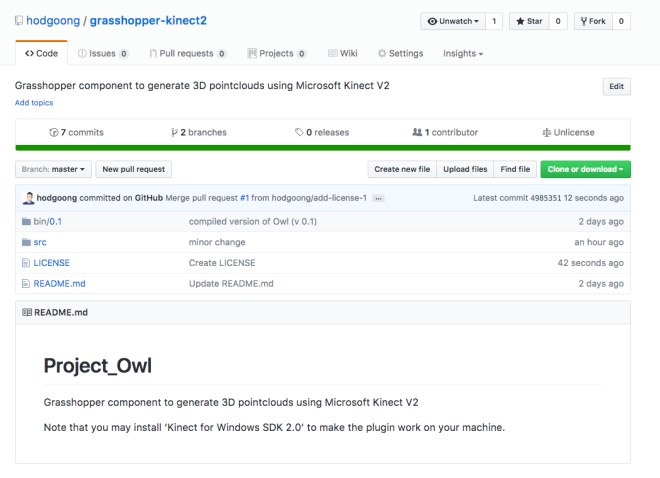
Now the license is in the project repository

Now the license file is in the project repo. People who visit this repo will now be able to understand this project better. Hope I didn’t miss anything.


The source code of Project Owl is on the Github now!

Project Owl was a small Grasshopper plugin that I developed during my master’s study. However, some might have already noticed that I stopped working on it for a while. I was really passionate about this project (I am generally very interested in reality capturing), but when I lost my most up-to-date WIP source code, I lost the passion as well. The situation wasn’t so great at that moment because I lost my MacBook at the same time. Yes, that’s how I’ve lost the source code, and it was all because I didn’t use the Github to back-up and share it with others.

Recently, I found out that some people actually visited my site to get the information about this tool. All the traffics were coming from the Grasshopper3D website (related post). So I thought why bury it deep in my computer when there are some other people who might need it? So I decided to upload the source code on the Github (https://github.com/hodgoong/grasshopper-kinect2) publically.

The code I’ve uploaded there is, as far as I remember, the very first working code which wasn’t optimized at all in terms of its performance. So I assume there will be many bugs (I beg not to blame my poor coding skill too much), but I believe smart people can figure things out and update the code. I hope I can work on this code soon again as well.